Easy DIY Oil Change: How to Change Your Car Oil Like a Pro

Learning how to change your car oil is one of the easiest ways to save money and protect your vehicle’s engine. Many drivers rely on mechanics, but performing a DIY oil change at home is simple with the right tools and guidance. A proper engine oil change at home ensures smooth engine lubrication, prevents costly repairs, and extends the life of your car.
Whether it’s your first time or a routine task, following a clear motor oil change guide helps you complete each oil and filter change safely and efficiently. Mastering this skill turns routine maintenance into smart car servicing at home.
Why Regular Oil Changes Are Important
Fresh oil works like a soft moving shield inside your engine. It reduces friction, carries heat away, and traps dirt before damage begins. When oil thickens, engine lubrication weakens. Temperatures rise. Parts wear faster. A timely vehicle oil service restores protection and keeps the engine running quietly.
Skipping oil changes always costs more later. Sludge forms. Fuel economy drops. Rubber seals dry out. Over time, small problems grow into expensive repairs. Think of oil as the engine’s lifeblood. Clean oil flows freely. Dirty oil clogs the system. Regular routine car maintenance through how to change car oil keeps everything alive and strong.
What You Need Before Changing Your Car’s Oil
Good preparation turns a messy task into a smooth one. You’ll collect old oil in an oil drain pan, loosen bolts with a socket wrench or ratchet set, and remove the filter using an oil filter wrench. The car must rest safely on jack stands and be lifted with a floor jack.
Comfort and safety also matter. A creeper protects your back. Nitrile gloves keep your hands clean. A magnetic work light brightens dark spaces. A funnel prevents spills. Keep brake cleaner nearby. Some cars include an under-engine shield held by plastic clips, so plan a few extra minutes for removal.
How to Choose the Right Oil for Your Car
Your owner’s manual always gives the correct oil type. The viscosity number, such as 0W-20 or 5W-30, describes how oil flows in cold starts and how it protects under heat. The wrong oil causes noise, drag, or poor protection. The right oil keeps everything smooth.
Climate matters too. Cold states benefit from thinner oils. Hot regions need stronger heat resistance. Synthetic oil lasts longer. Conventional oil costs less. Many modern engines require synthetic. Following the manual makes these engine oil replacement steps safer and strengthens your home oil change guide.
When Should You Change Your Engine Oil?
Mileage is only one signal. Time and driving habits matter just as much. Short trips, city traffic, towing, and extreme heat shorten oil life. Oil life monitors help, but your senses still count.
Dark oil, ticking sounds, or a fuel smell warn you early. These signs tell you when an oil and filter change is due. Staying alert protects engine lubrication and makes how to change your car oil a reliable routine.
Safety Tips to Follow Before You Start
Always work on level ground. Let the engine cool. Hot oil burns skin instantly. Support the car with jack stands before going underneath. Never trust only a jack. Give the car a gentle shake to confirm stability.
Wear gloves. Protect your eyes. Ventilate the space. Used oil harms skin and the environment. Prepare containers before loosening bolts. Safe habits turn oil change without mechanic work into calm, controlled car servicing at home.
Step-by-Step Guide: How to Change Your Car Oil at Home
This detailed section shows how to change car oil without stress. Each action builds on the one before it. Read once, then move slowly. You’ll finish a clean DIY oil change and complete a full engine oil change at home.
The process follows a simple rhythm. Lift, drain, replace, refill, and inspect. These engine oil replacement steps protect your engine and build confidence every time you practice how to change your car oil.
Step 1 – Lift the Car and Secure It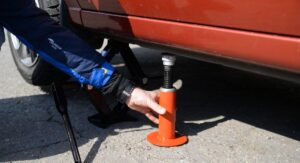
Position the floor jack at the proper lift point. Raise the car smoothly. Place jack stands under strong metal areas. Lower the car onto them. Test stability. Slide underneath on a creeper and brighten the area with a magnetic work light.
A steady base prevents spills and injury. It also keeps every part aligned. This first stage supports the entire car oil replacement process and prepares you for how to change your car oil safely.
Step 2 – Drain the Old Engine Oil 
Place the oil drain pan beneath the plug. Loosen it using a socket wrench or ratchet set. Hold the plug as oil begins to flow. Let it drain fully until only a thin stream remains.
Observe the oil. Shiny particles hint at wear. Thick sludge signals overdue service. These clues transform a basic vehicle oil service into a learning moment within how to change car oil.
Step 3 – Remove and Replace the Oil Filter
Locate the filter and turn it counterclockwise. Use an oil filter wrench if needed. Let remaining oil drip out before removing it. Always check that the old gasket came off with the filter.
Wipe the mounting surface clean. Lightly oil the new gasket. This helps it seal and makes the next change easier. This step completes the filter half of your oil and filter change and sharpens your change your own oil skill.
Step 4 – Reinstall the Drain Plug and Add New Oil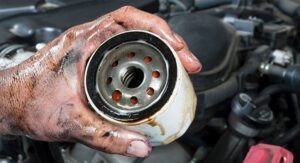
Thread the drain plug by hand. Tighten it firmly but gently. Replace any washer if required. Reinstall the under-engine shield and secure all plastic clips.
Open the hood. Remove the oil cap. Set a funnel in place. Pour the recommended amount slowly. Pause between pours. This controlled refill marks the turning point in how to change your car oil.
Step 5 – Check Oil Level and Look for Leaks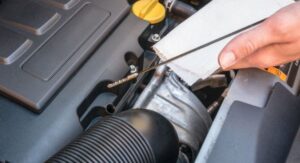
Start the engine for about ten seconds. Turn it off. Wait one minute. Pull the dipstick. Wipe it. Reinsert it. Check the level. Add a small amount if needed.
Inspect under the car and around the filter. No drips means success. You’ve completed a full engine oil change at home and mastered the core of how to change car oil.
How Much Oil Does Your Car Need?
Each engine needs a specific volume. Many four-cylinder engines take about four to five quarts. Larger engines may need six or more. The owner’s manual always lists the exact amount.
Too little oil increases heat. Too much oil whips into foam. Foam traps air. Air starves bearings. Precision protects engines. This knowledge strengthens your home oil change guide and improves every vehicle oil service.
| Engine Type | Common Oil Capacity |
|---|---|
| 4-cylinder | 4–5 quarts |
| V6 | 5–6 quarts |
| V8 | 6–8 quarts |
Common Mistakes to Avoid When Changing Engine Oil
The biggest mistakes happen when people rush. Wrong oil type, forgotten gaskets, and overtightened plugs cause most leaks. Slow down. Double-check. Small care prevents big repairs.
Another frequent error involves disposal. Never dump oil on the ground or in drains. Most U.S. auto stores accept used oil for recycling. Responsible habits elevate oil change without mechanic work into professional-level routine car maintenance.
What to Do After Changing Your Oil
Reset the oil life system if your vehicle has one. Take a short drive. Recheck the dipstick. Look underneath for leaks. Write down the date and mileage.
Clean tools with brake cleaner. Store supplies neatly. Recycle used oil and filters. Then enjoy the reward. You didn’t only learn how to change your car oil. You built a habit that protects engines and saves money.
FAQs
Q: How do I change my oil myself?
A: Lift the car safely, drain old oil, replace the filter, add new oil, and check the level.
Q: What are the 5 steps to an oil change?
A: Lift the car, drain old oil, replace the filter, refill with new oil, and check for leaks.
Q: How do I do an oil change in my car?
A: Follow your manual, drain old oil, replace the filter, refill with the correct oil, and inspect.
Q: Can we change car oil at home?
A: Yes, with proper tools and safety, you can perform a DIY oil change at home.
Q: Is it okay to add new oil to old oil?
A: No, old oil should be fully drained before adding new oil to avoid engine damage.
Pingback: How Long Do Car Batteries Last? Proven Ways to Prevent a Dead Battery 1